Perkenalan
- Javascript adalah bahasa pemrograman cross-platform, object-oriented
- Tujuan awal Javascript dikembangkan untuk membuat website/webpage menjadi interaktif, misalkan memiliki animasi yang kompleks, tombol yang memiliki custom behaviour, popup menu, mengubah webpage (DOM, domain object model) dll. Hal ini disebut client-side JS
- Namun Javascript juga bisa digunakan untuk mengembangkan server-side code, misalnya dengan Node.js yang memungkinkan kita untuk mengembangkan aplikasi server. Hal ini disebut server-side JS
- Standar JavaScript adalah Ecma International melalui ECMAScript specification
Assignment dan Tipe Data
- JS case-sensitive dan memakai unicode character set.
- Sebuah instruction di Javascript bisa disebut sebagai statement, dan setiap statement dipisahkan oleh semikolon atau baris baru. Semicolon optional, tapi merupakan best practive
- Comments:
// a one line comment

/* this is a longer,
 * multi-line comment
 */
Variabel
var: inisialisasi variabel, nilai awal opsional jadi bisa declare biasa dulu. Bisa digunakan untuk declare variabel local maupun global, tergantung posisi inisialisasilet: variabel local, terikat block-scoped, nilai awal opsionalconst: konstanta, block-scoped, harus diinisialisasi di awal nilainya- Naming variable umumnya
camelCaseScope Variabel
- Global: scope default untuk code yang running di script mode
- Module scope: scope code yang hanya berjalan di suatu module
- Function scope: scope code hanya di sebuah fungsi
- Block scope: scope code yang ada di sebuah curly braces saja
letdanconstitu block scope, bersifat local. Contoh:
if (Math.random() > 0.5) {
  const y = 5;
}
console.log(y); // ReferenceError: y is not defined
- Tetapi
varitu tidak block scoped, dia local terhadap fungsi atau global
if (true) {
  var x = 5;
}
console.log(x); // x is 5
Tipe Data
Primitif
- Boolean: true/false
- null value
- undefined, ketika suatu properti atau nilai belum didefinisikan
- Number: integer atau floating point
- BigInt: integer dengan batas besar
- String: sekumpulan karakter
- Symbol: tipe data unik dan immutable. Contoh:
const sym1 = Symbol();
const sym2 = Symbol("foo");
const sym3 = Symbol("foo");
Konversi Tipe Data
- JS adalah dynamically typed language, jadi kita tidak perlu specify tipe data ketika di-declare, JS akan otomatis convert dan infer tipe datanya
- Kode seperti ini tidak akan error meskipun tipe datanya berubah
let answer = 42;
answer = "String pengganti";
- Konversi tipe data bisa dilakukan misalnya dengan fungsi berikut:
parseInt,parseFloat,Number,String, atauNumber.toString
console.log(parseInt("123")); // 123
console.log(parseInt("077")); // 77 (leading zeros are ignored)

console.log(Number("12")); // 12
console.log(String(12)); // "12"

let num = 12;
console.log(num.toString()); // "12"
- Kombinasi number dengan string menggunakan
+operator akan menghasilkan string
x = "The answer is " + 42; // "The answer is 42"
y = 42 + " is the answer"; // "42 is the answer"
z = "37" + 7; // "377"
- Kombinasi number dengan string menggunakan operator lain tidak akan mengkonversi number menjadi string, misalnya:
"37" - 7; // 30
"37" * 7; // 259
Literals
Array
- Array bisa menampung berbagai tipe data berbeda di dalam satu array, karena setiap variabel di JS di-treat sebagai object, dan array adalah kumpulan object
let array = [Date.now(), "cars", 1, 2];
- Bisa memberikan space kosong juga di array agar nantinya bisa diisi
const myList = ["home", , "school", ,]; // Array index ke-1, 3 bisa diisi
Numbers
- Format dasar:
[digits].[digits][(E|e)[(+|-)]digits] - Contoh:
3.1415926
.123456789
3.1E+12
.1e-23
Objects
- Objects adalah list of zero atau lebih pairs antara property name dengan value-nya. Bentuk umum:
obj = { key: value }
Contoh:
const sales = "Toyota";

function carTypes(name) {
  return name === "Honda" ? name : `Sorry, we don't sell ${name}.`;
}

const car = { myCar: "Saturn", getCar: carTypes("Honda"), special: sales };

console.log(car.myCar); // Saturn
console.log(car.getCar); // Honda
console.log(car.special); // Toyota
Kita juga bisa nest object dan assign key dalam bentuk angka:
const car = { manyCars: { a: "Saab", b: "Jeep" }, 7: "Mazda" };

console.log(car.manyCars.b); // Jeep
console.log(car[7]); // Mazda
Object property name (key) bisa berbentuk empty string, tapi untuk mengakses arbitrary name harus menggunakan bracket notation ([]):
const unusualPropertyNames = {
  "": "An empty string",
  "!": "Bang!",
};
console.log(unusualPropertyNames.""); // SyntaxError: Unexpected string
console.log(unusualPropertyNames.!); // SyntaxError: Unexpected token !

console.log(unusualPropertyNames[""]); // An empty string
console.log(unusualPropertyNames["!"]); // Bang!
Semenjak ES6, sebuah key bisa dibuat dynamic:
const dynamicKey = "name"
const index = 1

const person = {
	[dynamicKey]: "John", // "name": "John"
	["age" + index]: 25, // "age1": 25
}
Strings
String literal:
// Basic literal string creation
`In JavaScript '\n' is a line-feed.`;

// Multiline strings
`In JavaScript, template strings can run
 over multiple lines, but double and single
 quoted strings cannot.`;

// String interpolation
const name = "Lev",
  time = "today";
`Hello ${name}, how are you ${time}?`;
Regex
- Bentuk contoh:
const re = /ab+c/;
Control Flow
- Sebuah block didefinisikan sebagai sekumpulan statement yang berada di antara curly braces, baik itu di dalam sebuah function, if-else, dll
{
  statement1;
  statement2;
  // …
  statementN;
} // Statement 1 - N adalah block statements
Conditional Statement
if (condition) {
	statement1;
} else if (condition2) {
	statement2;
} else if (conditionN) {
	statementN;
} else {
	statement3;
}
Switch Statement
switch (expression) {
  case label1:
    statements1;
    break;
  case label2:
    statements2;
    break;
  // …
  default:
    statementsDefault; // Fallback jika tidak ada match ke case lain
}
- Break digunakan supaya jika suatu case match, maka tidak akan cek case lain ke bawahnya
Try-Catch-Throw Exception
function getMonthName(mo) {
  mo--; // Adjust month number for array index (so that 0 = Jan, 11 = Dec)
  // prettier-ignore
  const months = [
    "Jan", "Feb", "Mar", "Apr", "May", "Jun",
    "Jul", "Aug", "Sep", "Oct", "Nov", "Dec",
  ];
  if (!months[mo]) {
    throw new Error("Invalid month code"); // throw keyword is used here
  }
  return months[mo];
}

try {
  // statements to try
  monthName = getMonthName(myMonth); // function could throw exception
} catch (e) {
  monthName = "unknown";
  logMyErrors(e); // pass exception object to error handler (i.e. your own function)
}
- Bisa menambahkan fungsi finally, jadi flow-nya:
try…catch…finally. Baik masuk ke try ataupun masuk ke catch, finally akan dijalankan di akhir
Loop dan Iterasi
for
- Sintaks dasar:
for (initialization; condition; afterthought)
  statement
- Contoh:
for (let step = 0; step < 5; step++) {
  // Runs 5 times, with values of step 0 through 4.
  console.log("Walking east one step");
}
- Contoh lain di HTML DOM manipulation:
<form name="selectForm">
<label for="musicTypes"
>Choose some music types, then click the button below:</label
>
<select id="musicTypes" name="musicTypes" multiple>
<option selected>R&B</option>
<option>Jazz</option>
<option>Blues</option>
<option>New Age</option>
<option>Classical</option>
<option>Opera</option>
</select>
<button id="btn" type="button">How many are selected?</button>
</form>
function countSelected(selectObject) {
  let numberSelected = 0;
  for (let i = 0; i < selectObject.options.length; i++) {
    if (selectObject.options[i].selected) {
      numberSelected++;
    }
  }
  return numberSelected;
}

const btn = document.getElementById("btn");

btn.addEventListener("click", () => {
  const musicTypes = document.selectForm.musicTypes;
  console.log(`You have selected ${countSelected(musicTypes)} option(s).`);
});
for..in
- Iterasi objek dengan mengakses property key objek secara langsung. Sintaks dasar:
for (variable in object)
  statement
- Contoh:
const fruits = ["Apple", "Oranges", "Blueberry"];
for (fruit in fruits) {
	console.log(fruit + " "); // "Apple Oranges Blueberry "
}

const car = {
	"make": "Ford",
	"model": "Mustang",
}

function dumpProps(obj, objName) {
  let result = "";
  for (const i in obj) {
    result += `${objName}.${i} = ${obj[i]}<br>`;
  }
  result += "<hr>";
  return result;
  // car.make = Ford
  // car.model = Mustang
}
for inmengiterasi key atau property name, jadiidi situ adalah iterasi terhadap property name-nya
for..of
- Jika
for inmengiterasi key/property name, makafor ofmengiterasi value-nya
const arr = [3, 5, 7];
arr.foo = "hello";

for (const i in arr) { // for in
  console.log(i);
}
// Output:  "0" "1" "2" "foo" (0 1 2 adalah index array yang jadi key)

for (const i of arr) { // for of
  console.log(i);
}
// Logs: 3 5 7 (value)
Pada kode di atas, “hello” tidak di-print karena ketika diinisialisasi. arr merupakan sebuah array, dan ketika kita menambahkan arr.foo = "hello", kita menambahkan properti, bukan menambahkan item. Jadi sebetulnya panjang arr tetap 3 dengan index 0,1,2, tapi ada tambahan properti (bukan isi array) yaitu foo.
for injuga digunakan untuk destructuring object. Di sini baru object bisa mengakses key dan value
const obj = { foo: 1, bar: 2 };

for (const [key, val] of Object.entries(obj)) {
  console.log(key, val);
}
// "foo" 1
// "bar" 2
while
- Sintaks dasar:
while (condition)
  statement
- Akan berjalan sampai condition bernilai false atau mencapai break. Contoh:
let n = 0;
let x = 0;
while (n < 3) {
  n++;
  x += n;
}
- Infinite loop
while (true) {
  console.log("Hello, world!");
}
do..while
- Perbedaan dengan
whileadalah kalauwhileitu cek kondisi dulu sebelum kode berjalan, tapido..whileitu berjalan dulu baru cek kondisi. Jadiwhilemungkin saja tidak pernah menjalankan kode block sama sekali. tapido..whilepasti minimal sekali berjalan code block-nya - Sintaks dasar:
do {
	statement
} while (condition)
- Contoh:
let i = 0;
do {
  i += 1;
  console.log(i);
} while (i < 5);
Labeled Statement
- Kita bisa melabeli/memberi identifier pada suatu statement yang bisa di-refer di kode
- Penggunaan spesifik biasanya dilakukan di
breakdancontinue
break dan continue
breakuntuk terminate whole loop, jadi kode di bawahnya tidak akan dijalankan lagicontinueuntuk skip statement di bawahnya, lanjut ke iterasi berikutnya- Bisa mengkombinasikan dengan labeled statement untuk melakukan operasi spesifik
let x = 0;
let z = 0;
labelCancelLoops: while (true) {
  console.log("Outer loops:", x);
  x += 1;
  z = 1;
  while (true) {
    console.log("Inner loops:", z);
    z += 1;
    if (z === 10 && x === 10) {
      break labelCancelLoops;
    } else if (z === 10) {
      break;
    }
  }
}
Functions
function square(number) {
  return number * number;
}
- Parameter fungsi di JS itu di-pass by value, jadi kalau kita ubah value parameter di dalam fungsi, perubahan itu tidak akan di-reflect di luar fungsi
let val = 12;

function changeVal(value) {
	value = 10;
}

changeVal(val);
console.log(val); //12
- Tetapi jika kita pass object, maka jika kita passing object itu ke fungsi, dan ubah propertinya, change akan reflected di luar fungsi
let obj = {
  "param1": 12,
  "param2": 10,
};

function changeObj(obj) {
  obj.param1 = 0;
}

changeObj(obj);
console.log(obj); // {param1: 0, param2: 10}
- Jika kita passing array sebagai parameter, perubahan terhadap value di dalam array akan reflected di luar fungsi juga
function myFunc(theArr) {
  theArr[0] = 30;
}

const arr = [45];

console.log(arr[0]); // 45
myFunc(arr);
console.log(arr[0]); // 30
- Function juga bisa nested, membentuk scope chain
function addSquares(a, b) {
  function square(x) {
    return x * x;
  }
  return square(a) + square(b);
}
- Ingat juga di awal kalau parameter yang di-passing ke function juga bisa berupa function
- Ini adalah contoh fungsi di-passing ke fungsi lain. Fungsi
cube()akan menghitung pangkat tiga darivalyang di-input, dan fungsimap()bertugas untuk mengiterasi setiap elemen di dalam sebuah array, dan melakukan operasi f() yang di-input terhadap setiap elemen array itu. Fungsi map() ini juga jadi logika yang sama untuk fungsi map bawaan dari JS
function map(f, a) {
  const result = new Array(a.length);
  for (let i = 0; i < a.length; i++) {
    result[i] = f(a[i]);
  }
  return result;
}

function cube(x) {
	return x * x * x;
}

const numbers = [0, 1, 2, 5, 10];
const cubedNumbers = map(cube, numbers);
console.log(cubedNumbers); // [0, 1, 8, 125, 1000]
- Atau kita bisa define sendiri fungsinya tanpa harus bikin fungsi dengan nama baru:
const cubedNumbers = map(function (x) {
  return x * x * x;
}, numbers);
Function Hoisting
- Meskipun kita memanggil fungsi di line yang lebih awal dibandingkan deklarasi fungsi, Javascript tetap dapat memanggil fungsi tersebut. Hal ini dikarenakan adanya function hoisting (diangkat ke atas) oleh JS interpreter
console.log(square(5)); // 25

function square(n) {
  return n * n;
}
Kode di atas tidak akan error, karena interpreter akan mengubah menjadi
// All function declarations are effectively at the top of the scope
function square(n) {
  return n * n;
}

console.log(square(5)); // 25
- Namun catatan penting, function hoisting hanya dapat berjalan untuk function declaration, bukan function expression. Jadi kode seperti ini tetap akan error:
console.log(square(5)); // ReferenceError: Cannot access 'square' before initialization
const square = function (n) {
  return n * n;
};
Immediately Invoked Function Expression (IIFE)
- IIFE adalah code pattern yang memungkinkan fungsi didefinisikan dalam bentuk expression dan langsung di-call saat itu juga
- Jadi instead of mendefinisikan fungsi terlebih dahulu dan kemudian dipanggil di code lain atau menyimpan value-nya melalui variabel lain, IIFE mendefinisikan fungsi di saat itu juga, dan dipanggil saat itu juga, tanpa intermediate definition/storing
(function () {
  // Do something
})(); // Fungsi ini akan langsung di-call dan di-execute saat line ini dieksekusi

const value = (function () {
  // Do something
  return someValue;
})(); // Fungsi langsung di-call, dan akan langsung dijalankan saat kode ini berjalan
Function Scope
- Variabel di dalam scope function (local) tidak akan bisa diakses dari luar function (global, tetapi function otomatis inherits dan bisa mengakses variabel dari luar function
// The following variables are defined in the global scope
const num1 = 20;
const num2 = 3;
const name = "Chamakh";

// This function is defined in the global scope
function multiply() {
  return num1 * num2;
}

console.log(multiply()); // 60

// A nested function example
function getScore() {
  const num1 = 2;
  const num2 = 3;

  function add() {
    return `${name} scored ${num1 + num2}`;
  }

  return add();
}

console.log(getScore()); // "Chamakh scored 5"
Closures
- Ingat scope di atas, sebuah fungsi bisa mengakses variabel yang satu level scope berada di atasnya. Misalkan:
let counter = 0;
function increase() {
	counter++;
}

increase();
console.log(counter); // 1
kode di atas valid dan bisa dijalankan.
- Masalah dari kode di atas adalah, variabel counter bisa dimodifikasi dari fungsi atau kode lain di manapun itu, jadi tidak safe. Misalkan kita tambahkan kode
counter = 12, maka nilai counter akan dimodifikasi ulang - Untuk itu, konsep closure diperkenalkan. Ketika sebuah fungsi didefinisikan dalam sebuah fungsi, inner function akan memiliki akses terhadap variabel yang ada di outer function, tetapi yang ada di luar function outer tidak akan bisa mengakses variabel di outer function tersebut. Berikut contohnya:
function outer() {
	let message = "hello";

	function inner() {
		console.log(message);
	}

	inner(); // Fungsi inner di-invoke
}

message = "overridden";
outer(); // Output: hello
- Selain itu, kita juga bisa membuat inner function di-return, sehingga jika kita invoke outer function, inner function otomatis di-invoke juga.
const getCode = (function () {
  const apiCode = "0]Eal(eh&2"; // A code we do not want outsiders to be able to modify…

  return function () {
    return apiCode;
  };
})();

console.log(getCode()); // "0]Eal(eh&2"
Atau variasinya:
const getCode = (function () {
  const apiCode = "0]Eal(eh&2";

  function getApi() {
	  return apiCode;
  }

  return getApi;
})();

console.log(getCode()); // "0]Eal(eh&2"
- Variasi lain, kita bisa return beberapa fungsi sekaligus, jadi ketika kita akan mengakses inner function, kita bisa mengaksesnya seperti layaknya kelas
function pet() {
  let name = "default";

  function getName() {
    return name;
  }

  function setName(newName) {
    name = newName;
  }

  return {getName, setName};
}

const myPet = pet();
console.log(myPet.getName()); // default

myPet.setName("New name");
console.log(myPet.getName()); // New name
- Jika kita hanya return satu inner function, function itu yang akan di-trigger
// The outer function defines a variable called "name"
const pet = function (name) {
  const getName = function () {
    // The inner function has access to the "name" variable of the outer function
    return name;
  };
  return getName; // Return the inner function, thereby exposing it to outer scopes
};
const myPet = pet("Vivie");

console.log(myPet()); // "Vivie"
Argument
- Seperti halnya di Python ada
args, di JS juga ada, namanya adalaharguments.argumentsini tidak perlu ditulis di dalam parameter function-nya, karena menjadi reserved keyword
function myConcat(separator) {
  let result = ""; // initialize list
  // iterate through arguments
  for (let i = 1; i < arguments.length; i++) {
    result += arguments[i] + separator;
  }
  return result;
}

console.log(myConcat(", ", "red", "orange", "blue"));
// "red, orange, blue, "

console.log(myConcat("; ", "elephant", "giraffe", "lion", "cheetah"));
// "elephant; giraffe; lion; cheetah; "

console.log(myConcat(". ", "sage", "basil", "oregano", "pepper", "parsley"));
// "sage. basil. oregano. pepper. parsley. "
- Kalau dari kode di atas, parameter yang diwajibkan adalah
separator, yang muncul di argument pertama (arguments[0]). Oleh karenanya di penggunaannya, argumen pertama yang digunakan adalah separatornya, lalu barulah di argumen-argumen setelahnya, diiterasi argument mulai dari indeks ke-1 (karena indeks ke-0 adalah separator-nya)
Default Parameter
- Argument juga bisa memakai default value seperti bahasa pemrograman lainnya
function multiply(a, b = 1) {
  return a * b;
}

console.log(multiply(5)); // 5
Rest Parameters
- Konsep ini yang paling dekat dengan arguments di atas, yaitu kita mendefinisikan bahwa function ini bisa menerima input parameter sebanyak apapun itu.
function multiply(multiplier, ...theArgs) {
  return theArgs.map((x) => multiplier * x);
}

const arr = multiply(2, 1, 2, 3);
console.log(arr); // [2, 4, 6]
Arrow/Lambda Function
- Arrow function adalah cara lain untuk mendefinisikan fungsi
const print = ((name) => {
  console.log(name)
})

print("halo") // halo

// Ekuivalen dengan

const print = (function(name) {
  console.log(name)
})

print("halo") // halo

const sumThree = ((a, b, c) => {
	return a + b + c;
})

console.log(sumThree(1, 2, 3)); // 6
Callback Function
Refer ke callback function
Expression dan Operator
- Bisa mengkombinasikan operator seperti:
x += yyang ekuivalen denganx = x + y - Operasi pangkat:
x ** y - Operasi logical:
x && yuntuk logical AND,x || yuntuk logical OR, danx ?? yuntuk mengecek nullish - Ternary operator:
condition ? if truthy : if falsy
Object
Referensi utama: MDN
Object Initialization
Object Initializer
Inisialisasi object secara biasa
const obj = {
  property1: value1, // property name may be an identifier
  2: value2, // or a number
  "property n": value3, // or a string
};
Kelebihan metode ini, kita juga bisa langsung definisikan method bawaan, namun perlu default value
// Animal properties and method encapsulation
const animalProto = {
  type: "Invertebrates", // Default value of properties
  displayType() {
    // Method which will display the type of animal
    console.log(this.type);
  },
};

// Create a new animal type called `animal`
const animal = Object.create(animalProto);
animal.displayType(); // Logs: Invertebrates

// Create a new animal type called fish
const fish = Object.create(animalProto);
fish.type = "Fishes";
fish.displayType(); // Logs: Fishes
Object Function Constructor
Function itu juga object, jadi kita bisa treat layaknya object
function Person(name, age, sex) {
  this.name = name;
  this.age = age;
  this.sex = sex;
}

const rand = new Person("Rand McKinnon", 33, "M");

console.log(rand.name); // Rand McKinnon
Object Destructuring
- Digunakan untuk unpack elements from an array atau properties of objects ke variabel-variabel berbeda
let a, b, rest;

arr = [1, 2, 3, 4, 5, 6];
[a, b, ...rest] = arr;
console.log(a); // 1
console.log(b); // 2
console.log(rest); // [3, 4, 5, 6]
const obj = { a, b, c };
const { a, b, c } = obj;
// Equivalent to:
// const a = obj.a, b = obj.b, c = obj.c;

const obj = { prop1: x, prop2: y, prop3: z };
const { prop1: x, prop2: y, prop3: z } = obj;
// Equivalent to:
// const x = obj.prop1, y = obj.prop2, z = obj.prop3;
Object Properties
Object Properties Enumeration
- Kita bisa enumerating dan iterating object properties dengan
for in
function showProps(obj, objName) {
  let result = "";
  for (const i in obj) {
      result += `${objName}.${i} = ${obj[i]}\n`;
    }
  }
  console.log(result);
}
- Kita bisa mengambil key-nya saja dengan
Object.keys(objectName) - Kita bisa mengambil value-nya saja dengan
Object.values(objectName)
let obj = {
  "prop1": 4,
  "prop2": 5,
  "prop3": 6
}

console.log(Object.values(obj)); // [4 5 6]
console.log(Object.keys(obj)); // [prop1 prop2 prop3]

for (const key of Object.keys(obj)) {
	console.log(key, obj[key])
}
// Output:
// prop1 4
// prop2 5
// prop3 6

// Equivalent to:
for (const key in obj) {
	console.log(key, obj[key])
}
Catatan:
- Di loop pertama, digunakan
for .. ofinstead offor .. inkarenafor initerate through the key, sementarafor ofiterate through the value. Ketika kita menggunakanObject.keys, akan menghasilkan array of keyname, jadi kalau kita memakaifor indi situ, key-nya malah akan jadi indeks array. - Masalah kedua, kenapa memakai
obj[key], bukanobj.key, karena memang tidak ada property pada objectobjyang bernamakey, jadi kita perlu isi si properti yang diiterasi dengan string dari loop, bukan string literalkey
Tipe Data Khusus
Date Object
- Tipe data tanggal dan waktu bisa menggunakan object
Date, dengan inisialisasi default waktu saat ini:const dateObjectName = new Date([parameters]);
Indexed Collection
Array
- Koleksi yang setiap datanya terurut berdasarkan indeks, seperti Array.
- Contoh inisialisasi array:
const arr1 = new Array(element0, element1, /* …, */ elementN);
const arr2 = Array(element0, element1, /* …, */ elementN);
const arr3 = [element0, element1, /* …, */ elementN];
const arr4 = Array(arrayLength);
- Panjang array:
arr.lengthatauarr["length"] - Akses:
arr[n] - Iterasi:
let arr = [1, 2, 3, 4];

for (let item in arr) {
	console.log(item);
}

for (let i = 0; i < arr.length; i++) {
	console.log(arr[i]);
}
- Tidak disarankan mengiterasi item dalam array menggunakan
for inkarena nantinya normal element dan seluruh property yang enumerable akan di-list juga concat(...items): Join dua array:
let myArray = ["1", "2", "3"];
myArray = myArray.concat("a", "b", "c");
// myArray is now ["1", "2", "3", "a", "b", "c"]
join(separator between items in string later): Convert array menjadi string
const myArray = ["Wind", "Rain", "Fire"];
const list = myArray.join(" - "); // list is "Wind - Rain - Fire"
push: Append 1 atau lebih elementpop: Pop (remove last element dan return element itu)
const myArray = ["1", "2"];
myArray.push("3"); // myArray is now ["1", "2", "3"]

const last = myArray.pop();
// myArray is now ["1", "2"], last = "3"
shift: Kebalikan dari pop, remove first element dan return element itu
const myArray = ["1", "2", "3"];
const first = myArray.shift();
// myArray is now ["2", "3"], first is "1"
unshift: Append satu atau lebih elemen ke awal arrayslice: Extract section of array, dari indeks mulai ke indeks akhir - 1
let myArray = ["a", "b", "c", "d", "e"];
myArray = myArray.slice(1, 4); // [ "b", "c", "d"]
// starts at index 1 and extracts all elements
// until index 3
splice: Mengganti atau menghapus item dari array, dimulai dariindexStartkeindexEnd - 1, lalu konten yang akan digantinya
const myArray = ["1", "2", "3", "4", "5"];
myArray.splice(1, 3, "a", "b", "c", "d");
// myArray is now ["1", "a", "b", "c", "d", "5"]
// This code started at index one (or where the "2" was),
// removed 3 elements there, and then inserted all consecutive
// elements in its place.
reverse: Reverse an arrayflat: Membuat array baru dengan menjadikan seluruh sub-array menjadi bagian dari array utama secara rekursif hingga depth tertentu (optional)
let myArray = [1, 2, [3, 4]];
myArray = myArray.flat();
// myArray is now [1, 2, 3, 4], since the [3, 4] subarray is flattened

const arr2 = [0, 1, [2, [3, [4, 5]]]];

console.log(arr2.flat());
// expected output: Array [0, 1, 2, Array [3, Array [4, 5]]]

console.log(arr2.flat(2));
// expected output: Array [0, 1, 2, 3, Array [4, 5]]
sort: Sort array, default ascending (dari kecil ke besar). Bisa passing function untuk membuat custom sorting. Jika ingin sort descending, bisa menggunakan.sort()baru.reverse
const myArray = ["Wind", "Rain", "Fire"];
myArray.sort();
// sorts the array so that myArray = ["Fire", "Rain", "Wind"]
Descending order:
const fruits = ["Banana", "Orange", "Apple", "Mango"];

// Method A: Quick sort and reverse
fruits.sort().reverse();

// Method B: Robust comparison (handles accents/case)
fruits.sort((a, b) => b.localeCompare(a));

console.log(fruits);
// Output: ["Orange", "Mango", "Banana", "Apple"]

const numbers = [40, 100, 1, 5, 25, 10]; // Sorts the array in place
numbers.sort((a, b) => b - a);
Custom sorting syntax:
sort(compareFn)

function compareFn(a, b) {
  if (a is less than b by some ordering criterion) {
    return -1; // Jadi a duluan baru b
  } else if (a is greater than b by the ordering criterion) {
    return 1; // Jadi b duluan baru a
  }
  // a must be equal to b
  return 0;
}
Contoh custom sorting (diurutkan berdasarkan panjang elemen string, dari yang terpendek ke terpanjang):
const sortFn = (a, b) => {
  if (a[a.length - 1] < b[b.length - 1]) {
    return -1; // Negative number => a < b, a comes before b
  } else if (a[a.length - 1] > b[b.length - 1]) {
    return 1; // Positive number => a > b, a comes after b
  }
  return 0; // Zero => a = b, a and b keep their original order
};
myArray.sort(sortFn);
// sorts the array so that myArray = ["Wind","Fire","Rain"]
indexOf: search posisi elemen dan return first occurence. Opsional: tambahkan mulai search dari index ke berapa
const a = ["a", "b", "a", "b", "a"];
console.log(a.indexOf("b")); // 1

// Now try again, starting from after the last match
console.log(a.indexOf("b", 2)); // 3
console.log(a.indexOf("z")); // -1, because 'z' was not found
lastIndexOf: kebalikanindexOf, search dimulai dari akhir array
const a = ["a", "b", "c", "d", "a", "b"];
console.log(a.lastIndexOf("b")); // 5

// Now try again, starting from before the last match
console.log(a.lastIndexOf("b", 4)); // 1
console.log(a.lastIndexOf("z")); // -1
Iterative Methods
-
Method yang mengiterasi item satu per satu dan menggunakan callback function terhadap setiap item yang di-iterate
-
forEach: Iterasi array dan execute fungsi callback di dalamforEach(function), returns undefined (tidak ada return apapun)
const colors = ["red", "green", "blue"];
colors.forEach((color) => console.log(color));
// red
// green
// blue
map: iterasi array dan return array baru, di mana setiap value dalam array berasal dari operasi callback yang dieksekusi. Jadi return dari callback function untuk setiap masukan item array, akan menjadi item baru di array baru nanti
const a1 = ["a", "b", "c"];
const a2 = a1.map((item) => item.toUpperCase());
console.log(a2); // ['A', 'B', 'C']
flatMap: kombinasiflatdan fungsimapdengan depth default 1
const a1 = ["a", "b", "c"];
const a2 = a1.flatMap((item) => [item.toUpperCase(), item.toLowerCase()]);
console.log(a2); // ['A', 'a', 'B', 'b', 'C', 'c']
Seperti yang Anda lihat, awalnya map akan return array untuk setiap item-nya, jadi bentuk:
[['A', 'a'], ['B', 'b'], ['C', 'c']]
tapi kemudian di-flatten
filter: return array baru yang mengandung item dengan kondisi item diproses fungsi callback return true
const arr = [10, 20, 30, 40, 50];
const arr2 = arr.filter((item) => item > 30);

console.log(arr2); // [40, 50]
find: Cari first element yang sesuai dengan kondisi dari fungsi callback
const a1 = ["a", 10, "b", 20, "c", 30];
const i = a1.find((item) => typeof item === "number");
console.log(i); // 10
-
findLast: kebalikan darifind, jadi return last element yang sesuai dengan kondisi dari fungsi callback -
findIndex: kalauindexOfitu return indeks dari elemen yang kita cari,findIndexitu menemukan index dari element yang kita cari sesuai dengan kondisi yang ada di fungsi callback. Kebalikannya simplyfindLastIndex
const a1 = ["a", 10, "b", 20, "c", 30];
const i = a1.findIndex((item) => typeof item === "number");
console.log(i); // 1
every: cek apakah seluruh item di array sesuai dengan kondisi di fungsi callback
function isNumber(value) {
  return typeof value === "number";
}
const a1 = [1, 2, 3];
console.log(a1.every(isNumber)); // true
const a2 = [1, "2", 3];
console.log(a2.every(isNumber)); // false
some: cek apakah at least 1 element di array sesuai dengan kondisi di fungsi callback
function isNumber(value) {
  return typeof value === "number";
}
const a1 = [1, 2, 3];
console.log(a1.some(isNumber)); // true
const a2 = [1, "2", 3];
console.log(a2.some(isNumber)); // true
const a3 = ["1", "2", "3"];
console.log(a3.some(isNumber)); // false
reduce: melakukan reduce atau mengurangi setiap item di dalam array sampai terakumulasi dalam satu item saja. Proses dilakukan dalam urutan menaik (ascending, indeks kecil ke besar). Sintaks dasar:
reduce(callbackFn)
reduce(callbackFn, initialValue)
dengan callbackFn berbentuk:
callbackFn(accumulator, currentValue, currentIndex, array)
Keterangan:
accumulator: hasil sementara/akhir dari call sebelumnya terhadap callbackFn. Jadi proses reduce dilakukan dengan memanggil fungsi callbackFn terus menerus hingga item di dalam array habis, di mana setiap satu kali callbackFn dipanggil, array akan di-shift (item elemen pertama di-pop) menjadi currentValue, lalu currentValue dioperasikan terhadap accumulator saat ini.
Contoh:
const array = [1, 2, 3, 4];

// 0 + 1 + 2 + 3 + 4
const initialValue = 0;
const sumWithInitial = array.reduce(
  (accumulator, currentValue) => accumulator + currentValue,
  initialValue,
);

console.log(sumWithInitial);
Proses:
- Reduce pertama:
array=[1, 2, 3, 4], shift indeks ke-0,currentValue= 1,accumulator=initialValue= 0 +currentValue= 1 - Reduce kedua:
array=[1, 2, 3], shift indeks ke-1,currentValue= 2,accumulator= 1 +currentValue= 3 - Reduce ketiga:
array=[1, 2], shift indeks ke-2,currentValue= 3,accumulator= 3 +currentValue= 6 - Reduce keempat:
array=[1], shift indeks ke-3,currentValue= 4,accumulator= 6 +currentValue= 10 - Selesai
Array Transformations
-
Proses pengubahan dari dan ke array
-
Object.groupBy: melakukan grouping object berdasarkan callback function
const inventory = [
  { name: "asparagus", type: "vegetables" },
  { name: "bananas", type: "fruit" },
  { name: "goat", type: "meat" },
  { name: "cherries", type: "fruit" },
  { name: "fish", type: "meat" },
];

const result = Object.groupBy(inventory, ({ type }) => type);
console.log(result);
// Logs
// {
//   vegetables: [{ name: 'asparagus', type: 'vegetables' }],
//   fruit: [
//     { name: 'bananas', type: 'fruit' },
//     { name: 'cherries', type: 'fruit' }
//   ],
//   meat: [
//     { name: 'goat', type: 'meat' },
//     { name: 'fish', type: 'meat' }
//   ]
// }
Pada contoh di atas, kita melakukan object destructuring, di mana kita meng-extract properties type, kemudian kita group inventory by type
Keyed Collections
Map
- Object yang berisi key-value
const sayings = new Map();
sayings.set("dog", "woof");
sayings.set("cat", "meow");
sayings.set("elephant", "toot");
console.log(sayings.size); // 3
sayings.get("dog"); // woof
sayings.get("fox"); // undefined
sayings.has("bird"); // false
sayings.delete("dog");
sayings.has("dog"); // false

for (const [key, value] of sayings) {
  console.log(`${key} goes ${value}`);
}
// "cat goes meow"
// "elephant goes toot"

sayings.clear();
sayings.size; // 0
Set
- Himpunan
const mySet = new Set();
mySet.add(1);
mySet.add("some text");
mySet.add("foo");

mySet.has(1); // true
mySet.delete("foo");
mySet.size; // 2

for (const item of mySet) {
  console.log(item);
}
// 1
// "some text"
Konversi ke Array
- Gunakan class
Array
// Convert set ke array
Array.from(mySet);
[...mySet2]; // destructuring first

// Convert array ke set
mySet2 = new Set([1, 2, 3, 4]);
Asynchronous Code
- Synchronous code: Kode yang berjalan secara sekuensial dan sinkron; kode berjalan di baris n-1 sebelum baris n (blocking, baris di bawah tidak akan dieksekusi sampai proses/baris di atasnya selesai)
- Asynchronous code: Kode yang berjalan di proses yang lain (atau background) dan tidak mengganggun proses kode synchronous (non-blocking)
- Javascript adalah bahasa pemrograman single threaded, jadi seluruh proses akan dijalankan melalui satu main thread saja. Kalau ada satu function/block code yang prosesnya lama, proses itu akan blocking whole program, karena program ke bawahnya tidak bisa berjalan sampai si code itu selesai dulu
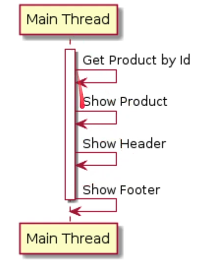 Sumber: Programmer Zaman Now
- Pada contoh di atas, fungsi get product by ID harus tamat terlebih dahulu (meskipun waktu eksekusi/prosesnya lama) barulah show product, show header, show footer bisa dijalankan
- Keuntungan async code: Misalkan ada kode yang proses eksekusinya panjang. Jika memakai synchronous, maka code itu akan blocking whole process (code di bawahnya tidak akan dijalankan sampai proses di kode itu selesai). Dengan async code, code itu akan berjalan secara asinkronus, dan program akan masih responsive dan berjalan seperti biasanya, hanya saja. Kode di baris selanjutnya akan tetap dieksekusi tanpa harus menunggu proses asynchronous selesai
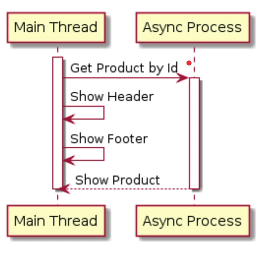 Sumber: Programmer Zaman Now
- Contoh sebelumnya diganti jadi proses asynchronous. Fungsi get product by ID dibuat asynchronous, jadinya fungsi show header dan show footer bisa berjalan secara normal. Sementara itu, fungsi show product baru akan dieksekusi jika fungsi get product by id ini selesai secara asinkron. Inilah yang disebut sebagai promise
- Dalam fungsi asynchronous tersebut, akan dibuat sebuah async process baru (ingat, process, bukan thread. Thread yang menjalankan process-nya, process adalah hal yang perlu dieksekusi)
Async Function
- Ada banyak asynchronous function, contohnya adalah
setTimeoutuntuk menjalankan proses asynchronous sekali setelah waktu tertentu, dansetIntervaluntuk menjalankan proses secara berulang (periodik) dalam interval waktu tertentu -
Jika ingin menghapus timeout dari
setTimeout, gunakanclearTimeout, dan untuk menghapus interval darisetInterval, gunakanclearInterval - Kedua fungsi ini menggunakan parameter
callbackfunction, yaitu block code yang akan dieksekusi setelah timeout/interval, dantimedalam satuan milisekon, yaitu kapan code akan dieksekusi/setelah berapa lama interval diulang
setTimeout(callback, timeInMilis)

// Logs "Hello" once after 2000 milliseconds (2 seconds)
const timeoutId = setTimeout(() => {
  console.log("Hello");
}, 2000);

// If you change your mind and want to cancel it before 2 seconds pass:
clearTimeout(timeoutId); // Sama dengan setInterval dan clearInterval

// Contoh lain

function addElement() {
	const header = document.createElement("h1");
	header.textContent = "Test";

	document.body.appendChild(header);
}

setTimeout(addElement, 3000); // Buat header dan append header baru akan dieksekusi 3 detik setelah code ini dijalankan
Callback Hell
- Sebuah kasus di mana kita memiliki 4 buah task, task pertama akan dijalankan 2 detik setelah kode berjalan. Task kedua pasti akan dijalankan 1,5 detik setelah task pertama selesai. Task ketiga pasti akan dijalankan 3 detik setelah task kedua selesai. Dan task keempat pasti akan dijalankan 1,5 detik setelah task ketiga selesai, dan terakhir notify user kalau seluruh proses sudah selesai
- Mungkin kita malah akan berpikiran untuk menjalankan kode seperti ini:
function task1() {
	setTimeout(() => {
		console.log("Task 1 finished");
	}, 2000)
}

function task2() {
	setTimeout(() => {
		console.log("Task 2 finished");
	}, 1500)
}

function task3() {
	setTimeout(() => {
		console.log("Task 3 finished");
	}, 3000)
}

function task4() {
	setTimeout(() => {
		console.log("Task 4 finished");
	}, 1500)
}

task1();
task2();
task3();
task4();
console.log("All task completed");
- Namun masalahnya, karena kode pemanggilan
task1-task4dijalankan synchronous, maka output-nya malah akan seperti ini:
All task complete
Task 2 complete
Task 4 complete
Task 1 complete
Task 3 complete
-
Hal ini dikarenakan pemanggilan task dijalankan secara synchronous, jadi task1 akan dibuat async, menunggu 2 detik, lalu lanjut ke task 2 tanpa menunggu task 1 selesai dulu, dijalankan langsung dengan menunggu 1,5 detik, kemudian tanpa menunggu task 2, task 3 dijalankan karena task 2 dijalankan secara async juga, dan seterusnya. Oleh karenanya, kita perlu chaining function agar task-task berjalan secara berurutan sesuai dengan selisih waktu antar task yang sesuai.
-
Untuk mengatasinya, kita bisa membuat setiap fungsi task otomatis memanggil fungsi task berikutnya, dengan membuat fungsi task menerima input fungsi berikutnya untuk dipanggil, sebagai contoh: fungsi task kedua harus dijalankan setelah task pertama, maka:
function task1(callback) {
	setTimeout(() => {
		console.log("Task 1 finished");
		callback();
	}, 2000)
}

function task2() {
	setTimeout(() => {
		console.log("Task 2 finished");
	}, 1500)
}

task1(() => task2);
akan menghasilkan output:
Task 1 finished
Task 2 finished
Karena setelah timeout 2 detik untuk console log task 1 finished selesai, otomatis dipanggil line berikutnya yaitu fungsi callback, yang di code pemanggilan memanggil fungsi task 2
- Kenapa di invocation (pemanggilan fungsi)
task1, kita tidak memakaitask1(task2()), karena hal ini berarti kita mengeksekusi dulutask2instead of giving reference atau definitiontask2ke callback functiontask1. Ditambah lagi masalahnya fungsitask2itu return nothing, jadinya return undefined. Basically jadi kalau kita memanggiltask1(task2()),task2nya return undefined, kodenya malah jaditask1(undefined). Jadinya kode yang benar seharusnyatask1(task2)), dantask2baru akan dieksekusi di dalam fungsitask1di bagiancallback(). -
Tapi masalah muncul kalau mau chaining ke fungsi
task3dantask4, karena kita tetap harus passingtask2(task3). Oleh karenanya, kita passing fungsinya dalam bentuk arrow function, seolah kita mendefinisikan fungsi baru, yang sebetulnya fungsi arrow itu mengeksekusi fungsitaskselanjutnya. - Jika diterapkan ke seluruh kode task, akan menjadi:
function task1(callback) {
	setTimeout(() => {
		console.log("Task 1 finished");
		callback();
	}, 2000)
}

function task2(callback) {
	setTimeout(() => {
		console.log("Task 2 finished");
		callback();
	}, 1500)
}

function task3(callback) {
	setTimeout(() => {
		console.log("Task 3 finished");
		callback();
	}, 3000)
}

function task4(callback) {
	setTimeout(() => {
		console.log("Task 4 finished");
		callback();
	}, 1500)
}

task1(() => {
	task2(() => {
		task3(() => {
			task4(() => {
				console.log("All task completed");
			})
		})
	})
});
- Kode itulah yang disebut callback hell atau pyramid of doom, karena kita keep stacking dan insert, indent the code untuk memastikan kode yang satu berjalan setelah kode sebelumnya selesai secara asinkronus.
Promise
- Promise (janji), jadi kita menjanjikan sebuah block code ini pasti akan dijalankan jika kondisi sebelumnya sudah terpenuhi
- Promise pasti dijalankan, baik ketika operasi sebelumnya dianggap berhasil dijalankan (resolve) atau gagal dijalankan (reject)
- Sintaks dasar:
Promise(resolveCode, rejectCode (optional));
- Fungsi/block code
resolveberarti menandakan jika fungsi asynchronous berhasil, fungsi itulah yang akan dieksekusi selanjutnya - Fungsi/block code
rejectberarti menandakan jika fungsi asynchronous gagal, fungsi itulah yang akan dieksekusi selanjutnya - Contoh:
const checkServer = new Promise((resolve, reject) => {
  let success = true; // Dummy, mensimulasikan network condition. Kita bisa ganti misalkan dengan operasi lain yang menandakan apakah success atau tidak. Di sini disimulasikan check server berhasil
  if (success) {
  // Jika berhasil, maka fungsi yang akan dipanggil berikutnya, akan di-passing-kan data string "Server is online"
	console.log("Checking server success");
    resolve("Server is online!");
  } else {
  // Jika gagal, maka fungsi yang akan dipanggil berikutnya, akan di-passing-kan data string "Server is offline"
    console.log("Checking server failed");
    reject("Server is offline.");
  }
});
- Kemudian kita akan handle operasi selanjutnya yang akan dieksekusi dengan fungsi
then(). Fungsi ini digunakan untuk handle outcome atau hasil dari fungsi asynchronous sebelumnya. Sintaks dasar:
promise.then(onFulfilled, onRejected (optional));
- Jadi sebetulnya fungsi
then()akan memberikan fungsi yang akan dijalankan untuk promise sebelumnya, di bagian resolve reject tersebut.
// Using .then() to handle both outcomes
checkServer.then(
  (data) => console.log("Success:", data), // Runs if resolved. Kode ini yang akan dijalankan di resolve promise sebelumnya
  (error) => console.error("Error:", error) // Runs if rejected. Kode ini yang akan dijalankan di reject promise sebelumnya
);
- Fungsi
then()juga sebetulnya menjalankan Promise baru, jadi bisa di-chaining lagi:
fetch("https://example.com")
  .then((response) => response.json()) // step 1: parse JSON data. .json() itu return JSON data
  .then((user) => {
    console.log("User data retrieved:", user);
    return user.id; // pass data to the next .then()
  })
  .then((userId) => console.log("User ID is:", userId)) // step 2: use the ID
  .catch((err) => console.error("Something went wrong:", err)); // catches any error in the chain
- Contoh lain:
function getUser() {
    return new Promise((resolve, reject) => {
        setTimeout(() => {
            const success = true; // Dummy, kita bisa ganti misalkan dengan operasi lain yang menandakan apakah success atau tidak. Di sini disimulasikan fetch data berhasil

            if (success) {
            // Jika berhasil, maka fungsi yang akan dipanggil berikutnya, akan di-passing-kan data user berikut
                resolve({
                    id: 1,
                    name: "Bagas"
                });
            } else {
	            // Jika gagal, maka fungsi yang akan dipanggil berikutnya, akan mendapatkan throw error berikut
                reject(new Error("Failed to get user"));
            }
        }, 2000);
    });
}
getUser()
    .then((user) => { // then dipanggil
        console.log(user);
    })
    .catch((error) => {
        console.error(error);
    });
- Dari analogi di penjelasan sebelumnya,
taskN+1wajib dijalankan setelahtaskNselesai dilakukan. Oleh karenanya, kita membutuhkan Promise untuk itu. Jadi jika diubah menjadi:
function task1() {
	return new Promise((resolve, reject) => {
		setTimeout(() => {
			console.log("Task 1 finished");
			resolve(); // Pemanggilan fungsi berikutnya
		}, 2000);
	})
}

function task2() {
	setTimeout(() => {
		console.log("Task 2 finished");
	}, 1500)
}

task1().then(() => { task2() })
- Alur dari kode sekarang:
task1()
  │
  ▼
Promise created
  │
  ▼
pending
  │
  │ 2 detik
  ▼
console.log(...)
  │
  ▼
resolve()
  │
  ▼
fulfilled
- Kalau misalkan kita chain seluruh kode, jadinya seperti ini:
function task1() {
    return new Promise((resolve, reject) => {
        setTimeout(() => {
            console.log("Task 1 finished");
            resolve();
        }, 2000);
    });
}

function task2() {
    return new Promise((resolve, reject) => {
        setTimeout(() => {
            console.log("Task 2 finished");
            resolve();
        }, 1500);
    });
}

function task3() {
    return new Promise((resolve, reject) => {
        setTimeout(() => {
            console.log("Task 3 finished");
            resolve();
        }, 3000);
    });
}

function task4() {
    return new Promise((resolve, reject) => {
        setTimeout(() => {
            console.log("Task 4 finished");
            resolve();
        }, 1500);
    });
}

// Eksekusi
// Tidak memakai task() kurung karena fungsi itulah yang dipanggil di resolve() di fungsi task sebelumnya, jadi tidak perlu pakai kurung lagi.
// Kemudian taskN+1 juga sudah otomatis return promise untuk digunakan di task selanjutnya juga
task1()
    .then(task2)
    .then(task3)
    .then(task4)
    .then(() => {
        console.log("All task completed");
    });

// Bentuk lain
// Memakai arrow function, kita akan return fungsi taskN+1 karena fungsi itu akan dieksekusi dulu, baru hasilnya yaitu Promise di-return
// Contoh, return task2(), kita tahu task2() return Promise. Tapi karena dia bentuknya return task2(), task2() akan dieksekusi dulu, jadi return task2() -> return new Promise()
task1()
    .then(() => {
        return task2();
    })
    .then(() => {
        return task3();
    })
    .then(() => {
        return task4();
    })
    .then(() => {
        console.log("All task completed");
    });
Async Await
- Jika kita tidak ingin melakukan chaining method dan membuat kode seperti synchronous, maka dapat dilakukan chaining menggunakan
async/await asyncdigunakan untuk membuat fungsi yang akan dijalankan secara asinkronus, dan akan return sebuah promiseawaitdigunakan untuk menunggu hasil dari fungsiasyncreturn promise- Contoh:
function resolveAfter2Seconds() {
  return new Promise((resolve) => {
    setTimeout(() => {
      resolve("resolved");
    }, 2000);
  });
}

async function asyncCall() {
  console.log("calling");
  const result = await resolveAfter2Seconds();
  console.log(result);
  // Expected output: "resolved"
}

asyncCall();
- Di kode di atas dapat dilihat bahwa fungsi
resolveAfter2Secondsakan menjalankanresolvedengan data string “resolved”. Kemudian kita jalankan fungsiasyncCallsecara async, di mana ada parameterresultyang menunggu output menggunakanawaitdari fungsiresolveAfter2Seconds. Setelah fungsiresolveAfter2Secondsselesai dan return Promise berisi string “resolved”, dengan menggunakan keywordawait, Promise itu fulfilled dan akhirnyaconst resultmenyimpan string result = “resolved”. - Contoh lain di Express:
public async getFeedContent(req: Request, res: Response): Promise<void> {
	try {
		const id = parseInt(req.params.id);
		if (!id) {
			res.status(400).json({ error: 'ID is required' });
			return;
		}
		const content = await feedService.getFeedContent(id);
		res.json(content);
	} catch (error: Error | any) {
		res.status(500).json({ error: error.message });
	}
}
Modules
- Pemisahan code menjadi beberapa source file atau code placement yang berbeda
Export dan Import Module
- Agar bisa diakses oleh modul atau file lain, suatu objek/fungsi/variabel dapat di-expose dengan keyword
export. Kemudian file lain bisa mengakses hal tersebut menggunakanimport - Jika kita export atau import multiple parameters, bisa memakai {}
// Export single
export const name = "square";

// Export single
export function draw(ctx, length, x, y, color) {
  ctx.fillStyle = color;
  ctx.fillRect(x, y, length, length);

  return { length, x, y, color };
}

// Export multiple
export { name, draw, reportArea, reportPerimeter };

import { name, draw, reportArea, reportPerimeter } from "./modules/square.js";
Export/Import Alias
- Kita bisa menggunakan alias baik untuk export maupun untuk import
import { name as circleName } from "https://example.com/shapes/circle.js";
import { name as squareName, draw } from "./shapes/square.js";

export { name as circleName };
Export/Import Other Filetype
- Jika ingin import dari file non-JS, gunakan
with {type: "fileType" }:
import colors from "./colors.json" with { type: "json" };
import styles from "./styles.css" with { type: "css" };
- Di file HTML, jika kita declare
<script>tag dengan menggunakantype="module", maka kode tersebut akan di-treat sebagai module, memungkinkan menggunakanimportdanexport
Export/Import Default
- Export/import sebelumnya disebut sebagai named export/import, karena kita melakukan export dan import harus menyebutkan nama yang fix dan sama. Misalkan kita
export var1atauexport newvar as var1, maka di file lain yang import variabel tersebut harus menyebutkan spesifikimport var1, nama variabel yang dipanggil harus sama - Export/import default adalah satu buah export utama dari sebuah modul
- Contoh:
const var1 = 10;

export default var1;
- Dan ketika import nantinya, nama variabelnya tidak harus sama karena itu merupakan default export-nya
import abc from "./module.js"; // Tetap valid
- Kita juga bisa mengkombinasikan export named dengan export default
// data.js

const var1 = 10;
const var2 = 20;
const var3 = 30;

export default var1;
export { var2, var3 };
- Import-nya untuk default exported value tidak perlu pakai kurung kurawal {}, tapi untuk named wajib pakai
import var1, { var2, var3 } from "./data.js";
import newName, { var2, var3 } from "./data.js";
Object Oriented
Class
Constructor
Package Manager
- Ekosistem Node.js sangat luas, dan dapat dikelola dengan mengekstensikan third party packages seperti Node Package Manager ataupun Bun
npm
- Node package manager (npm) adalah package manager dengan penggunaan terluas saat ini
-
Untuk melihat daftar package, dapat melihat https://www.npmjs.com/
- Untuk inisialisasi project, gunakan command
npm init
bun
-
Bun dibuat dengan mengandalkan kecepatan, dan kelebihannya dalam integrasi dengan Typescript (dijelaskan di Typescript)
-
Untuk inisialisasi project, gunakan command
bun init. Akan ada 3 opsi:
Typescript
- Typescript memberikan type safety kepada Javascript, di mana kita harus explicitly mendefinisikan tipe data
- Perbedaan:
| Features | Javascript | Typescript |
|---|---|---|
| Typesystem | Dynamic (diperiksa di runtime) | Static (diperiksa di compilation) |
| Execution | Run natively di browser dan Node.js environment | Harus di-compile dulu ke JS |
| Error detection | Dideteksi di eksekusi | Dideteksi di kompilasi |
Data Type
Type
- Type adalah pembuatan tipe data custom atau alias untuk tipe data primitif
- Contoh:
// Union Types (Cannot be built with interfaces)
type Status = "pending" | "approved" | "rejected"; // Jadi bisa salah satu dari ini

// Primitive & Tuple Aliases
type ID = string | number;
type Coordinate = [number, number];

type SuccessResponse = {
    status: "success";
    data: string;
};

type ErrorResponse = {
    status: "error";
    error: string;
};

type APIResponse = SuccessResponse | ErrorResponse;

// Atau

type APIResponse = {
    status: "success";
    data: string;
} | {
    status: "error";
    error: string;
};


// Object Shape Extension via Intersection
type AdminUser = { id: ID } & { privileges: string[] };
- Kelebihan type dibanding interface:
- Bisa alias ke data primitif (string, number, dll)
- Bisa mendefinisikan union types (gabungan beberapa type, bisa salah satu type tersebut, contohnya yang APIResponse di atas)
- Lebih sederhana untuk array. Contoh:
// Type
type Address = [number, string];

// Interface
interface Address extends Array<number | string> {
	0: number;
	1: string;
}
- Kita bisa extract type dari dalam type itu sendiri. Contoh:
const project = {
	title: "Project 1",
	specification: {
		area: 100,
		rooms: 3,
	}
}

type Specification = typeof project.specification; // {area: number; rooms: number;}
Additional note: kita bisa menambahkan as const jika kita tidak ingin value itu berubah dari specification
const project = {
	title: "Project 1",
	specification: {
		area: 100,
		rooms: 3,
	}
}

type Specification = typeof project.specification; // {readonly area: 100; readonly rooms: 3;}
- Biasanya kita menggunakan nama type dengan huruf depan T sebelum inisialisasi tipe data, misalkan
TUser,TFile
class User implement TUser {}
Interface
- Interface adalah kontrak atau struktur yang wajib diikuti oleh suatu kelas/objek/data
- Interface tidak bisa digunakan untuk mendefinisikan type alias terhadap primitif, jadi hanya bisa terhadap object saja
interface UserRole {
	name: string;
	role: string;
	status: "active" | "inactive";
}
- Kita juga tidak bisa mendefinisikan union di interface
- Kelebihan interface dibanding type:
- Kita bisa merge dan extend interface dengan cara declare interface dengan nama yang sama lebih dari sekali, meskipun ini bisa jadi bumerang kalau kita lupa kita sudah pernah inisialisasi interface itu
interface User {
	name: string;
	age: number;
}

interface User {
	role: string;
}

let user: User; // User {
//	name: string;
//	age: number;
//	role: string;
//}
- Error message interface lebih singkat, tapi lebih detail dan presisi
- Jika user menggunakan T, interface biasanya menggunakan I, jadi bentuknya
IUseratauIFile
class User implements IUser {}
Enum
- Enumeration
- Contoh:
// Numeric Enum (Defaults to auto-incrementing integers: 0, 1, 2)
enum LogLevel {
  Debug, // 0
  Info,  // 1
  Error  // 2
}

// Bisa diisi juga dengan value
enum UserType {
  Admin = “admin”,
  Customer = “customer”
}

// Usage
const currentLog = LogLevel.Error; // Resolves to 2 in JavaScript
console.log(UserType.Admin); // admin
Generics
- Generics adalah tipe data yang memungkinkan kita untuk tidak mendefinisikan tipe data dulu
- Kenapa kita ingin memakai generics? Kenapa tidak ingin spesifik tipe datanya. Misalkan begini, kita ingin membuat tipe data stack, tapi masalahnya kalau kita ingin stack untuk integer, stack untuk string, stack untuk object User, kita tidak mungkin membuat 3 class stack untuk 3 tipe data yang berbeda. Oleh karenanya kita membuat generics
- Generics ditandari dengan lambang
<T>, di mana T adalah tipe data yang nanti akan di-passing dan bisa diganti-ganti (tidak harus T, biasanya tapi T atau K) - Sebetulnya di Typescript kita bisa menggunakan tipe data
anyjika kita tidak ingin spesifik menyebutkan tipe datanya apa, tapianyitu unsafe dan warned by Typescript - Contoh menggunakan
any:
function getFirstElement(arr: any[]): any {
    return arr[0];
}
- Jika menggunakan generics:
function getFirstElement<T>(arr: T[]): T {
    return arr[0];
}
Nantinya kita akan bisa mengganti T dengan tipe data apapun ketika diinisialisasi dan digunakan.
- Berikut contohnya untuk kasus stack di atas:
class Stack<T> {
    private items: T[] = [];

    push(item: T): void {
        this.items.push(item);
    }

    pop(): T | undefined {
        return this.items.pop();
    }
}

const numberStack = new Stack<number>();
numberStack.push(1);
numberStack.push(2);
console.log(numberStack.pop()); // Outputs: 2
- Dapat dilihat kita memberikan tipe number untuk stack tersebut, menggantikan placeholder T
Omit
- Kembali ke type dan interface, misalkan kita memilki suatu tipe data
UserPropssebagai berikut:
type UserProps = {
	ID: string;
	name: string;
	email: string;
	age: number;
	createdAt: Date;
}
- Lalu kemudian kita ingin membuat sebuah tipe data baru, akun Guest, jadi dia cukup input nama dan email saja untuk menggunakan aplikasi. Kita bisa langsung membuat tipe data baru
GuestPropsdengan menulis ulang seluruh kode:
type GuestProps = {
	name: string;
	email: string;
	age: number;
}
- Atau, kita bisa minta Typescript untuk membuang parameter yang tidak digunakan untuk
GuestPropsdenganOmit<Original data type, data to remove>, dalam kasus ini kita tidak memerlukancreatedAtdanID, jadi kita bisa buang itu
type GuestProps = Omit<UserProps, "createdAt | "ID"> // Remove createdAt dan ID
-
Jika ingin remove multiple field, gunakan , jika tidak cukup tulis satu field nya saja
Pick
- Kebalikan dengan Omit yang membuang field, Pick memilih field mana yang akan diambil untuk tipe data baru
-
Sama seperti Omit, jika kita ingin memilih multiple field, gunakan
type File = {
	filename: string;
	filesize: number;
	extension: string;
	createdAt: Date;
	path: string;
	updatedAt: Date;
}

type FileEssential = Pick<File, "filename" | "extension"> // Hanya ambil filename dan ekstensinya
Extends
- Sekarang bagaimana kalau kita ingin menambah parameter dari type? Gunakan extends
- Untuk
interfacegunakan keywordextends, untuktypegunakan&
type Person = {
	name: string;
	age: number;
}

type Employee = Person & {
	employeeId: number;
}

interface Person {
    name: string;
    age: number;
}

interface Employee extends Person {
    employeeId: number;
}
Kompilasi dan Transpilasi
- Typescript tidak dapat dijalankan secara native di browser atau Node.js. Oleh karenanya, agar dapat berjalan, Typescript biasanya dikompilasi terlebih dahulu dengan package
typescriptdari package manager, menjadi file-file Javascript di folderdist, dan di-run dengan menggunakannode compiled-main-app.js - Behavior tersebut default di npm, namun di Bun, Bun tidak perlu melakukan kompilasi terpisah menjadi file .js dulu baru dijalankan menggunakan Node. Bun melakukan transpilasi, yaitu proses kompilasi tapi tidak menjadi kode yang sepenuhnya berbeda
- Kompilasi adalah menerjemahkan program dari satu representasi ke representasi lain. Kompilasi merujuk pada broader terms, intinya selama kode diubah jadi bentuk lain, itu adalah kompilasi
- Transpilasi adalah proses menerjemahkan source code dari satu bahasa atau versi bahasa ke bahasa lain yang berada pada tingkat abstraksi yang kurang lebih sama. Jadi transpilasi adalah salah satu tipe kompilasi, tapi penerjemahan kodenya tidak terlalu jauh/memiliki abstraksi yang sangat mirip
- Namun dalam konteks saat ini, proses kompilasi lebih sering disebut sebagai: “proses mengubah kode menjadi machine code”, dan transpilasi adalah “source to source”, yang berarti kode diubah menjadi kode lain
- Kesamaan bun dan npm adalah mereka tetap menjalankan typecheck, yaitu pemeriksaan syntax sebelum file TS dikompilasi/ditranspilasi
- Flow kompilasi di npm:
Node tradisional:

app.ts
  │
  │ tsc
  ▼
app.js          ← file fisik dibuat
  │
  │ node
  ▼
JavaScript Engine
  │
  ▼
Machine code
- Flow transpilasi di bun:
app.ts
  │
  │ Bun transpiler
  ▼
JavaScript      ← ditransformasi secara internal
  │
  ▼
JavaScriptCore
  │
  │ JIT compilation
  ▼
Machine code
- Salah satu flow kompilasi dan transpilasi TS ke JS adalah type erasure, yaitu menghapus explicit type setelah type checking selesai. Contoh:
let name: string = 'Kealan';
dikompilasi/transpilasi menjadi:
let name = 'Kealan';
tsconfig.json
- Berisi konfigurasi bagaimana file Typescript dicek, dibuat, dikompilasi, di-run
- Informasi lengkap: https://www.typescriptlang.org/tsconfig
noEmit
- Seperti yang dijelaskan sebelumnya, Typescript normalnya ketika dijalankan/dikompilasi akan melakukan typecheck barulah dikompilasi ke file JS
- Dengan memakai
noEmit, Typescript hanya akan menjalankan typecheck dan syntax check saja, dan proses transformasi/kompilasi dijalankan oleh package manager/program lain - Value inilah yang direkomendasikan dan menjadi default di Bun, karena Bun tidak menjalankan kompilasi ke file JS dulu, jadi mereka menggunakan option ini di tsconfig.json
erasableSyntaxOnly
- Pada proses kompilasi TS ke JS, kita bisa mengkonfigurasi proses kompilasi agar sesegera mungkin melakukan type erasure, yaitu drop/hapus explicit type
// Typescript
const x: number = 10;

// Javascript
const x = 10;
- Namun, ada masalah jika misalkan kita menggunakan tipe data yang baru di-construct di runtime, misalnya seperti enum:
enum Role {
  Admin,
  User
}

const role = Role.Admin;
- Enum ini bukanlah type. Dia baru akan diubah menjadi type di runtime, misalnya menjadi:
var Role;

(function (Role) {
  Role[Role["Admin"] = 0] = "Admin";
  Role[Role["User"] = 1] = "User";
})(Role || (Role = {}));

const role = Role.Admin;
- Operasi yang baru dijalankan di runtime ini akan menghambat proses kompilasi ataupun transpilasi. Jadinya supaya lebih cepat, kita dapat set
erasableSyntaxOnlyke True agar setiap pemakaian enum atau runtime construct lainnya di-detect sebagai error.
verbatimModuleOnly
- Opsi ini mengatur bagaimana TypeScript memperlakukan
importdanexport. Dengan opsi ini, TypeScript memakai aturan yang jauh lebih eksplisit:
import type { User } from "./user";
adalah import yang hanya dipakai untuk type, sehingga boleh dihapus saat transpilation.
- TypeScript mendokumentasikan bahwa dengan
verbatimModuleSyntax, import/export tanpa modifiertypedipertahankan, sedangkan yang menggunakantypedihapus. - Ini berbeda dari perilaku TypeScript lama yang melakukan import elision. Import elision berarti TypeScript mencoba menganalisis apakah suatu import hanya digunakan sebagai type, apakah type itu di-export lagi atau tidak, barulah Typescript menentukan apakah import itu bisa dihapus dari compiled JS atau tidak.
- Kalau menggunakan
verbatimModuleSyntaxsebagai True, maka kita dipaksa untuk menjadikanimport typesebagai hal yang bisa dihapus di saat proses kompilasi, sementara import yang tidak memakai type adalah import penting yang bahkan diperlukan di runtime